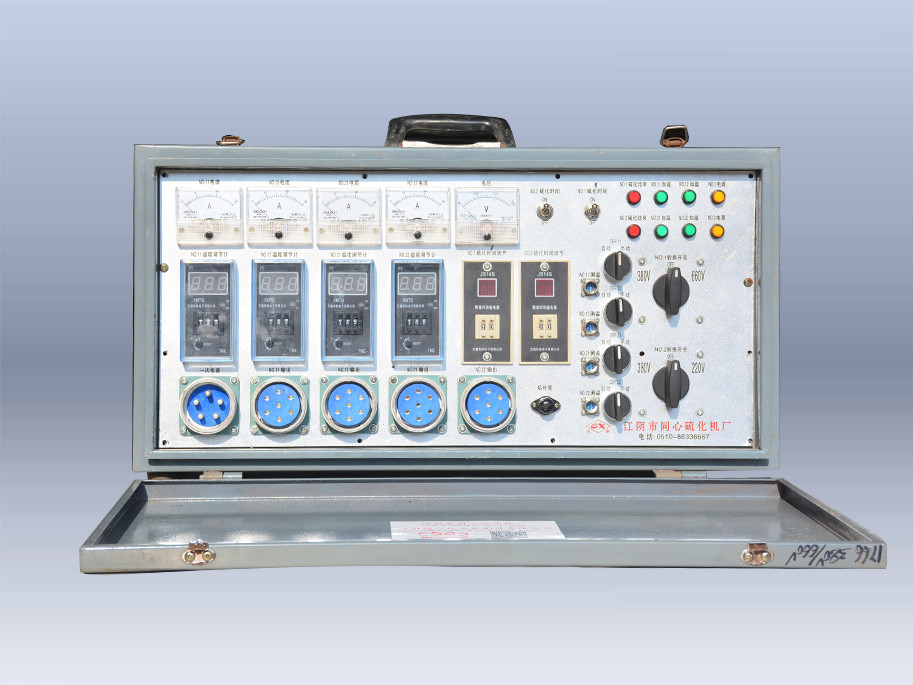
Water-cooling vulcanizing machine (hereinafter referred to as vulcanizing machine) control box
The quality of the tape joint directly affects the working efficiency of the tape, the effectiveness of use, the service life, especially the current long distance, and the high-strength conveyor belt is more important. Therefore, the DJSL type electric heating tape vulcanizing machine is indispensable in the current tape transportation machinery. Auxiliary equipment.
The components of the water-cooling vulcanizer are light and can be moved by hand. The power and water source should be considered before installation. Use a special water pipe to connect the tap water source with the upper and lower heating plate cooling water pipes of the vulcanizer, but do not release water for a while. At this time, start the constant temperature to the end of the vulcanization constant temperature time. At this time, open the tap water and pass the water to the hot plate. When the temperature drops to the process value. When the water is disassembled, the vulcanization operation is completed.
DJSL type electric heating water cooling vulcanizer parameter table:
| project/data/model |
DJSL type electric heating water cooling vulcanizer parameter table:
width
(mm) |
specification |
Heating plate size
Heating plate size
(mm) |
Total power
(kw) |
Heavy weight
(kg) |
Dimensions
Length × width × height
(mm) |
total weight
(kg) |
Configuring device |
| Manual pump |
Electric control box |
| DJSL-650 |
650 |
650×830 |
830×820 |
9.8 |
56 |
1320×830×585 |
398 |
1 |
1 |
| 650×1000 |
1000×820 |
11.8 |
66 |
1320×1000×585 |
460 |
1 |
1 |
| DJSL-800 |
800 |
800×830 |
830×995 |
11.97 |
70 |
1450×830×585 |
485 |
1 |
1 |
| 800×1000 |
1000×995 |
14.4 |
79 |
1450×1000×585 |
550 |
1 |
1 |
| DJSL-1000 |
1000 |
1000×830 |
830×1228 |
14.7 |
82 |
1700×830×585 |
556 |
1 |
1 |
| 1000×1000 |
1000×1228 |
17.8 |
95 |
1700×1000×585 |
596 |
1 |
1 |
| DJSL-1200 |
1200 |
1200×830 |
830×1431 |
17.2 |
96 |
1950×830×750 |
784 |
1 |
1 |
| 1200×1000 |
1000×1431 |
20.7 |
113 |
1950×1000×750 |
900 |
1 |
1 |
| DJSL-1400 |
1400 |
1400×830 |
830×1653 |
23.8 |
107 |
2150×830×900 |
857 |
1 |
1 |
| 1400×1000 |
1000×1653 |
23.9 |
132 |
2150×1000×900 |
1080 |
1 |
1 |
| DJSL-1600 |
1600 |
1600×830 |
830×1867 |
22.3 |
120 |
2380×830×900 |
1102 |
1 |
1 |
| 1600×1000 |
1000×1867 |
27 |
146 |
2380×1000×900 |
1400 |
1 |
1 |
| DJSL-1800 |
1800 |
1800×830 |
830×2079 |
24.9 |
137 |
2620×830×900 |
1247 |
1 |
1 |
| 1800×1000 |
1000×2079 |
30 |
164 |
2620×1000×900 |
1500 |
1 |
1 |
| DJSL-2000 |
2000 |
2000×830 |
830×2303 |
27.6 |
154 |
2830×830×900 |
1385 |
1 |
1 |
| 2000×1000 |
1000×2303 |
33.2 |
182 |
2830×1000×900 |
1750 |
1 |
1 |
| DJSL-2200 |
2200 |
2200×830 |
830×2478 |
29.7 |
165 |
2997×830×900 |
1446 |
1 |
1 |
| 2200×1000 |
1000×2478 |
35.8 |
198 |
2997×1000×900 |
1800 |
1 |
1 |
The main structure:

The vulcanizer has a main machine (1. frame; 2. clamping mechanism; 3. horn; 4. screw; 5. nut; 6. washer; 9. heat shield 10. upper heating plate; 14. lower heating plate; 15. Water pressure plate;) 7. High pressure hose; 8. Pressure test pump; 11. Secondary cable; 12. Electric control box; 13. Primary cable composition.
Vulcanizer installation:
1. Before the installation of the combing machine, the main parts (such as electric heating plates, pressure devices, racks, etc.) are evenly separated and separated, and the vulcanizer is temporarily transported to the site for temporary installation.
2, each separate separation of the parts, is also a frequent moving parts. Generally, the heaviest parts can be handled by two people, so it is convenient to install and disassemble.
3. Before installation, find a more spacious place on the installation of the tape conveyor. In this place, not only the indefinite operating area and space, but also the placement of the tape and the power wiring are convenient.
4. Before installation, on the belt conveyor installation line, disassemble the upper rollers and set up a working platform in the form shown in Figure 2. If it is glued in the field, use a canvas to build a temporary rainproof shed around the work platform.
5. Install the tools of the vulcanizing machine, the tools for processing the tape joints, the power supply wires, etc., and confirm that the glued village materials (such as cover rubber, core glue and glue) are within the validity period, the manufacturer and the production date.

6. Installation of the vulcanizer is carried out as follows:
(1) Place the single lower machine in the form shown in Figure 3;
(2) As shown in Figure 4, first place the pressure device (water pressure plate) on the placed lower frame machine; then place the lower electric plate on it. After the three are aligned, the lower electric heating plate is covered with plastic film (or talcum powder);
Note: When multiple vulcanizers work in parallel, a thin metal plate with a 0.2x50x seam length is placed at the joint of the lower electric plate.
(3) Place the tape joints that have been processed and processed well and filled with the rubber material on the lower hot plate; after finding the center line, fix the tape on both sides with the clamp plate and the clamping mechanism. Its form is shown in Figure 5;
(4), on the tape joint. Place the plastic film (or talcum powder) in the position corresponding to the lower hot plate, and then place the electric heating plate and the heat insulation board on it in order. Its form is shown in Figure 6.
Note: When multiple vulcanizers work in parallel, a thin metal plate with a 0.2x50x seam length is placed at the joint of the lower electric plate.
(5) Place the upper frame on the heat insulation board as shown in Figure 7, and align and align with the lower frame.
(6) According to Figure 8, install the pre-tightening bolts, washers and nuts in the elongated holes at the upper and lower frames, and tighten the nuts with a wrench. At this point, the main part of the vulcanizer is installed.
(7) According to Fig. 9, the quick joint of the pressure pump system is connected with the water inlet hole of the pressure device, and the primary power supply wire is correspondingly inserted into the socket of the electric heating control box, and one end of the secondary wire is inserted in the electric heating control box. On the socket, the other end is inserted on the hot plate; the corresponding one of the thermal resistance (or thermocouple) wire is inserted into the socket of the electric heating control box, and the other end is inserted into the temperature measuring hole of the electric heating plate. At this time, the vulcanization installation is completed, and the timing operation of pressurization and heating is prepared..

Vulcanizer operating procedures:

1. Primary power supply 11, lower plate heating indication 2, fuse tube 12, vulcanization end indication 3, lower plate current indication 13, primary power indication 4, upper plate current indication 14, air leakage automatic switch 5, upper plate control switch 15. Time meter 6, upper plate temperature meter 16, manual/automatic switch 7, lower plate temperature meter 17, vulcanization time switch 8, lower plate control switch 18, lower plate power supply 9, voltage indication 19, upper plate power supply 10, Upper plate heating indication 20, grounding screw
 2, dial 6,7 upper finger set the vulcanization temperature (145 ° C) adjustment 15 set vulcanization holding time; 17 placed (OFF) position; turn on the power, 13 bright. Close the 14 and 10 reading indications; rotate 5, 8, 10, 11 respectively, respectively, 6, 7 green light is on. Use the test pump to inject water into the water pressure plate to set the water pressure. When the temperature reaches the set value, 10, 11 lights off, 6, 7 green light is off, red light is on, when the 6 and 7 red lights are all on, put 17 in the "ON" position. (At this point, the temperature is constant until the end of vulcanization) 15 preset time, the secondary power supply is automatically disconnected, 12 bright, and the vulcanization is over. If a meter is damaged during the vulcanization process, it can be rotated 6 to the manual position, and all instruments have no effect. The hot plate temperature can be read from the mercury thermometer, and can be controlled by 5, 8 to maintain the constant temperature, thereby completing the vulcanization work. In the manual position, the leakage protection does not work and the total grounding wire must be reliable and secure.
 Your message must be between 20-3,000 characters!
 Please check your E-mail!
  Your message must be between 20-3,000 characters!
 Please check your E-mail!

