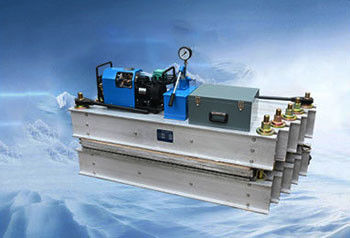
Main structure of tape curing machine:
The vulcanizing machine has a host (1. frame; 2. clamping mechanism; 3. horn; 4. screw; 5. nut; 6. washer; 9. heat insulation plate 10. upper heating plate; 14. lower heating plate; 15. Hydraulic pressure plate;) 7. High-pressure hose; 8. Pressure test pump; 11. Secondary cable; 12. Electric control box; 13. Primary cable composition.
Matters needing attention in the installation of tape curing machine:
1. Before the carding machine is installed, the main parts (such as electric heating plate, pressure device, frame, etc.) are evenly and independently separated. The vulcanizing machine is transported to the site and installed temporarily on time. 4. Before installation, on the tape conveyor installation line, remove the upper support rollers and set up a working platform using the method of alchemy, etc. as shown in Figure 2. If glued in the wild, use canvas to build a temporary rain shelter around the working platform.
2, each independent separation mechanism is also often moved. Generally, the heaviest parts can be carried by two people, so installation and removal are relatively easy.
5. The tools for installing the vulcanizer, the tools and tools for processing the tape joints, and the power wires are ready until they are ready; and confirm whether the bonding materials (such as covering rubber, core rubber and glue, etc.) are within the validity period, manufacturer and production date.
3. Before installation, find a more spacious place on the installation of the belt conveyor. In this place, there is not only an uncertain operating area and space, but also a place for tape and convenient power wiring.
Installation steps of tape curing machine:
(1) Put down the form of single root;
(2) First place the pressure device (water pressure plate) on the rack-mounted machine; then place the lower heating plate on it. After the three are aligned, cover the lower heating plate with plastic film (or sprinkle with talcum powder);
Note: When multiple vulcanizing machines work side by side, place a thin metal plate with 0.2x50x seam length at the joint of the lower heating plate.
(3) Place the tape joints that have been processed and processed and filled with rubber on the lower hot plate; after aligning the center line, fix the two sides of the tape with a clamp plate and a clamping mechanism.
(4) Above the tape joint. Place a plastic film (or talcum powder) at the position corresponding to the lower heating plate, and then place a heating plate and a heat insulation plate on it in order. Its form is shown in Figure 6.
Note: When multiple vulcanizing machines work side by side, place a thin metal plate with 0.2x50x seam length at the joint of the lower heating plate.
(5) Place the upper frame on the heat shield, and align and align with the lower frame.
(6) According to Figure 8, install the pre-tightening bolts, washers and nuts in the long holes at both ends of the upper and lower frames, and tighten the nuts with a wrench. At this point, the main part of the curing machine is installed.
(7) Connect the quick connector of the booster pump system to the water inlet of the pressure device, and insert the primary power lead into the socket of the electric heating control box accordingly, and plug one end of the secondary lead into the socket of the electric heating control box. The other end is plugged into the electric heating board; the corresponding resistance (or thermocouple) wire is inserted into the socket of the electric heating control box, and the other end is inserted into the temperature measuring hole of the electric heating board. At this time, the vulcanization installation is all completed, and the timing operation of pressure and heating is ready.
| Project/Data/Model |
Adhesive tape
width
(mm)
|
specification |
Heating plate size
Length × width
(mm)
|
Total power
(kw) |
Heavy weight
(kg) |
Dimensions
Length × width × height
(mm)
|
total weight
(kg) |
Configuring device |
| Manual pump |
Electric control box |
|
TXCK-650
DJSL/DGLJL-650
|
650 |
650×830 |
830×820 |
9.8 |
56 |
1320×830×585 |
398 |
1 |
1 |
| 650×1000 |
1000×820 |
11.8 |
66 |
1320×1000×585 |
460 |
1 |
1 |
|
TXCK-800
DJSL/DGLJL-800
|
800 |
800×830 |
830×995 |
11.89 |
70 |
1450×830×585 |
485 |
1 |
1 |
| 800×1000 |
1000×995 |
14.4 |
79 |
1450×1000×585 |
550 |
1 |
1 |
|
TXCK-1000
DJSL/DGLJL-1000
|
1000 |
1000×830 |
830×1228 |
14.7 |
82 |
1700×830×585 |
556 |
1 |
1 |
| 1000×1000 |
1000×1228 |
17.8 |
95 |
1700×1000×585 |
596 |
1 |
1 |
|
TXCK-1200
DJSL/DGLJL-1200
|
1200 |
1200×830 |
830×1431 |
17.2 |
96 |
1950×830×750 |
784 |
1 |
1 |
| 1200×1000 |
1000×1431 |
20.7 |
113 |
1950×1000×750 |
900 |
1 |
1 |
|
TXCK-1400
DJSL/DGLJL-1400
|
1400 |
1400×830 |
830×1653 |
19.8 |
107 |
2150×830×900 |
857 |
1 |
1 |
| 1400×1000 |
1000×1653 |
23.9 |
132 |
2150×1000×900 |
1080 |
1 |
1 |
|
TXCK-1600
DJSL/DGLJL-1600
|
1600 |
1600×830 |
830×1867 |
22.3 |
120 |
2380×830×900 |
1102 |
1 |
1 |
| 1600×1000 |
1000×1867 |
27 |
146 |
2380×1000×900 |
1400 |
1 |
1 |
|
TXCK-1800
DJSL/DGLJL-1800
|
1800 |
1800×830 |
830×2079 |
24.9 |
137 |
2620×830×900 |
1247 |
1 |
1 |
| 1800×1000 |
1000×2079 |
30.. |
164 |
2620×1000×900 |
1500 |
1 |
1 |
|
TXCK-2000
DJSL/DGLJL-2000
|
2000 |
2000×830 |
830×2303 |
27.6 |
154 |
2830×830×900 |
1385 |
1 |
1 |
| 2000×1000 |
1000×2303 |
33.2 |
182 |
2830×1000×900 |
1750 |
1 |
1 |
|
TXCK-2200
DJSL/DGLJL-2200
|
2200 |
2200×830 |
830×2478 |
29.7 |
165 |
2997×830×900 |
1446 |
1 |
1 |
| 2200×1000 |
1000×2478 |
35.8 |
198 |
2997×1000×900 |
1800 |
1 |
1 |

1.Frame
2.clamping mechanism
3.horn
4.screw
5 .nut
6. Washer
7. High pressure hose
8 .Pressure test pump
9 .heat shield
10.upper heating plate
11.Secondary cable
12.Electric control box
13.Primary cable
14.lower heating plate
15.Water pressure plate
1. Before the installation of the combing machine, the main parts (such as electric healing plates, pressure devices, racks, etc.) are evenly separated and separated, and the vulcanizer is temporarily transported to the site for temporary installation.
2. each separate separation of the parts, is also a frequent moving parts. Generolly, the heaviest parts can be handled by two people, so it is convenient to install and disassemble.
3. Before installation, find a more spacious place on the installation of the tape conveyor. In this place, not only the indefinite operating area and space, but also the placement of the tape and the power wiring are convenient.
4.Before installation, on the belt conveyor installation line, disassemble the upper rollers and set up a working platform in the form shown in Figure 2. If it is glued in the field, use a canvas to build a temporary rainproof shed around the work platform
5.Install the tools of the vulcanizing machine, the tools for processing the tape joints, the power supply wires, etc., and confirm that the glued village materials (such as cover rubber, core glue and glue) are within the validity period, the manufacturer and the production date.
6. Installation of the vulcanizer is carried out as follows:
(1) Place the single lower machine in the form shown in Figure 3;
(2) As shown in Figure 4, first place the pressure device (water pressure plate) on the placed lower frame machine; then place the lower electric plate on it. After the three are aligned, the lower electric heating plate is covered with plastic film (or talcum powder); Note: When multiple vulcanizers work in parallel, a thin metal plate with a 0.2x50x seam length is placed at the joint of the lower electric plate.
(3) Place the tape joints that have been processed and processed well and filled with the rubber material on the lower hot plate; after finding the center line, fix the tape on both sides with the clamp plate and the clamping mechanism. Its form is shown in Figure 5;
(4) on the tape joint. Place the plastic film (or talcum powder) in the position corresponding to the lower hot plate, and then place the electric heating plate and the heat insulation board on it in order. Its form is shown in Figure 6.
Note: When multiple vulcanizers work in parallel, a thin metal plate with a 0.2x50x seam length is placed at the joint of the lower electric plate
(5) Place the upper frame on the heat insulation board as shown in Figure 7, and align and align with the lower frame.
(6) According to Figure 8, install the pre-tightening bolts, washers and nuts in the elongated holes at the upper and lower frames, and tighten the nuts with a wrench. At this point, the main part of the vulcanizer is installed.
(7) According to Fig. 9, the quick joint of the pressure pump system is connected with the water inlet hole of the pressure device, and the primary power supply wire is correspondingly inserted into the socket of the electric heating control box, and one end of the secondary wire is inserted in the electric heating control box. On the socket, the other end is inserted on the hot plate; the corresponding one of the thermal resistance (or thermocouple) wire is inserted into the socket of the electric heating control box, and the other end is inserted into the temperature measuring hole of the electric heating plate. At this time, the vulcanization mounting is completed, and the timing operation of pressurization and heating is prepared.
Maintenance and maintenance
1. Before use. check the insulation resistance of the hot plate. If it is too low, it should be energized and dried until the insulation value reaches 50MΩ or less.
2. in the use of moving in the process should be handled with care. civilized operation;
3.If you work in the field, you should have reliable rain and water proof means to avoid being affected by rain and moisture.
4.When the use of its length is completed. it should be placed in the warehouse where the air circulation, relative humidity is not more than 85%. and is not affected by rain. The sleeper is raised below, and it is strictly prohibited to be placed on the ground
 Your message must be between 20-3,000 characters!